26 Jan What is an extract beer kit?
WHAT IS AN EXTRACT BEER KIT?

One of the first decisions every new home brewer should make is whether to brew with an extract beer kit or all-grain. To determine which is best for you, you need to consider your lifestyle and your budget for your new hobby.
Both techniques produce incredible beers, so don’t listen to anyone who says that one method is “more authentic” while the other is a “shortcut!” Your choice should be made based on a few factors:
-
- How much time do you have to devote to your new hobby?
-
- How much room do you have for brewing equipment?
-
- What kind of budget are you working with?
If you’ve got a busy schedule (or young kids), if you don’t have the space (or the budget) for specialty equipment or if you’re a bit intimidated to brew your first beer, you’ll find that an extract beer kit is the perfect jumping off point! Low start up costs, ease of use and efficiency make extract perfect for your first homebrewing experience. So what is an extract beer kit, exactly? Let’s review!
EXTRACT vs. ALL-GRAIN
Extract and all-grain brewing use the same foundational ingredients: barley, hops, yeast & water. The difference lies in how the brewer uses and prepares the barley on brew day.
")
Think of it like making lasagna. You can make your lasagna noodles from scratch, with eggs and flour, before assembling your dish & baking. Or, you can use store bought lasagna noodles (also made with eggs and flour). Both will taste amazing, but one method saves you a lot of time and extra steps. Think of extract brewing like using a box of pasta.
In all-grain brewing, the homebrewer is responsible for extracting sugars from malted barley. This is done by milling, mashing & sparging the grains to create wort (unfermented beer). In extract brewing, the homebrewer uses malt extract (packaged dehydrated wort), skipping all those time-consuming steps. This shaves hours off of the brew day process and helps reduce opportunity for error.
A majority of homebrewers get their start with an extract beer kit. Malt extract is a high-quality ingredient that’s approachable and ensures a great first homebrewing experience!
WHAT IS AN EXTRACT BEER KIT’S ADVANTAGE OVER ALL-GRAIN?
There are SEVERAL! While both all-grain and extract beer kits produce delicious beer, there are plenty of reasons why a majority of homebrewers get their start with an extract beer kit like Craft a Brew’s 1 gallon Home Beer Brewing Kit.

vs
TIME SAVED
Brewing with an extract beer kit shaves hours off of your brew day. The average all-grain brew day can take 3 to 6 hours, while brewing with an extract beer kit clocks in at about 1.5 hours.
But don’t assume that less time means that extract is a lesser ingredient. Malt extract is created by maltsters (malt makers & growers) who perform all the labor intensive steps for you. The result is a professional, high quality malt extract that is ready to use right out of your kit.
Considering that a homebrewed beer still requires 2 weeks to ferment and 2 weeks to carbonate in bottles, it’s helpful to save time wherever you can. A shorter brew day means that you can (and are more likely) brew more often.
")
MONEY SAVED
A LOT less equipment is needed when brewing with an extract beer kit. In fact, brew day takes place in ONE large stock pot, which you likely already own.
On the other hand, all-grain brewing requires multiple vessels for mashing, sparging and brewing your beer. As you brew larger volumes of beer, equipment with special features, like false bottoms or installed spigots, become necessary. All of these components add up quickly and result in a much higher start up cost for new brewers.
What is an extract beer kit going to require you to go out and purchase? Not much! Most all-inclusive extract kits, like Craft a Brew’s First Time Homebrewer Gift Package, come with everything you need for brew day, fermentation & bottling in a compact box. You’ll just need a large pot to brew in and a spoon to stir!

SPACE REQUIRED
The extra vessels required for the various steps of the all-grain process take up space – especially if you grow your home brewery to brew 5 or more gallons. On brew day you may need to clear space outdoors or in your garage to perform all the transfers. This also means you need somewhere to store it all when not in use.
An extract beer kit is perfect for space-constrained brewers, because you can brew on your stove in one vessel.

Image credit: Instagram @uncapeverything
REDUCED ERROR & CONSISTENT RESULTS
Simply put, there are more opportunities to ‘mess up’ when brewing an all-grain beer. One of the most difficult tasks in all-grain brewing is achieving the target gravity (target sugar content), which determines the final ABV.
Because extract has already undergone this process, the risk of missing the target gravity is eliminated. A professional has already done this for you, dehydrated the wort and packaged it up. Time saved, mess ups avoided!
Another major advantage to brewing with malt extract: consistency between batches. Using extract means that you can brew your favorite recipes, months apart, and they’ll taste the same. Without the margin of error, you’ll have consistently excellent beers every time you brew.

@brew_luminati
WHAT IS AN EXTRACT BEER KIT MADE OF?
Depending on the beer kit you purchase, it may include one of two varieties of malt extract:
LIQUID MALT EXTRACT (LME):
Liquid malt extract – used in Mr. Beer homebrew kits – looks a lot like molasses and has water content (roughly 20%). It is often packaged in cans, which are shelf stable for years. Unfortunately, this can mean that your liquid extract beer kit has been sitting on a shelf, getting dusty, for a few years. Liquid malt extract is commonly pre-hopped. While this may help to produce consistent beers, it does eliminate a fun part of the brew day process: choosing & adding the hops!
DRY MALT EXTRACT (DME):
Dry malt extract, which is used in Craft a Brew beer kits, is further dehydrated so that it has no water content. It comes in a powdered form that looks a lot like tan flour. Dry malt extract is relatively subtle in flavor, simply providing the base fermentable sugars. This makes it a versatile base for whatever style of beer you want to brew!


SPECIALTY GRAINS
What is an extract beer kit without specialty grains? Sugar water, essentially! Extract base malts provide your homebrew with fermentable sugars, but it’s the specialty grains that add flair.


Specialty grains are quite diverse and range from chocolate, to honey, to caramel malts. The combination of specialty grains used with an extract kit will dial in a beer’s color, flavor and aromatics. They can be smokey, bready, doughy, biscuity, acidic, roasty and more. A specialty “grain bill” can also include barley, oats or even rye to add mouthfeel, haze or protein to the beer.
")
To extract the flavors from specialty grains, they are steeped in hot water – like tea – before adding the malt extract. Once specialty grains and malt extract are incorporated, the boil begins and hops are added for balance.
Specialty malts can be grown by large, well-known brands like Briess and smaller, family owned malt farms like Mecca Grade Estate. Craft a Brew uses countless varieties of specialty malts in our beer kits:
This beer pours like a blonde, but drinks like a stout. How? Creative use of American Smoked Malts for rich stout flavor and flaked oats for substantial mouthfeel. Cacao nibs and coffee beans add flavor without any of the dark color.
Biscuit Malts add an almost ‘saltine cracker’ flavor, while Special Roast adds subtle sourdough-like tang. Chocolate Wheat malt helps intensify the dark color and aromas while balancing things out with roasty flavor.
This juicy IPA features a hefty dose of oats, which contribute to the haze and smooth mouthfeel. Honey Malts lend light honey notes and a hint of ‘pretzel.’ The grain bill is capped off with Carapils, which helps head retention.
This jet black stout gets its dark color & foamy brown head from Black Malts. These also give many stouts and porters a sharp, slightly tart flavor.
WHAT IS AN EXTRACT BEER KIT?
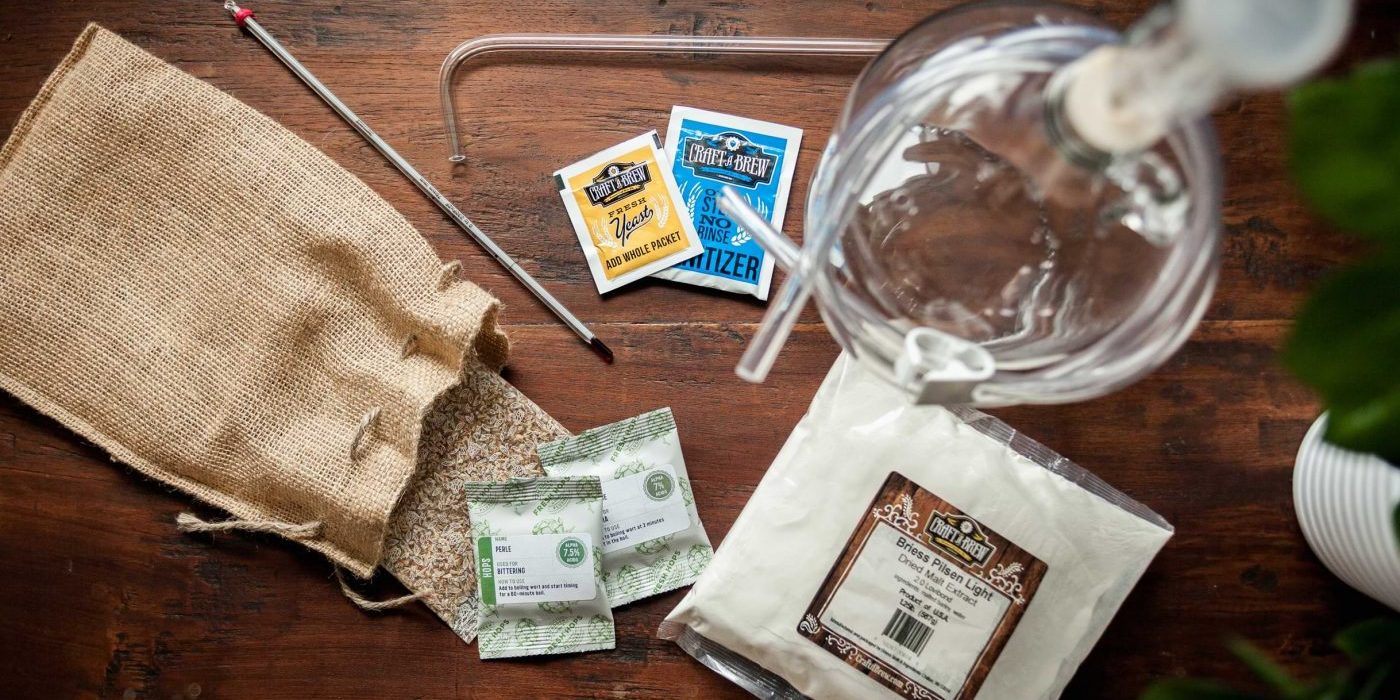
An extract beer kit, like Craft a Brew’s home beer brewing kits, will include everything you need to brew and ferment your own beer:
EQUIPMENT:
-
- 1 gallon glass carboy
- Funnel
- Racking cane, transfer tubing & tubing clamp for bottling
- Thermometer
- Guide to Craft Brewing
- Sanitizer
INGREDIENTS:
-
- Dry Malt Extract
- Specialty Grains & a steeping sock
- Hops
- Yeast
- Special ingredients (like cacao nibs, orange peel, spices or whatever the recipe may call for)
If you’re new to brewing, an extract beer kit is a great way to make sure you have everything you need without sourcing items from all over the internet (or worrying that you’ve forgotten something).
HOW TO BREW WITH AN EXTRACT BEER KIT
BREW DAY (~1.5 hours)
-
-
-
- Pour as close to a gallon of water in your brew pot as you can, leaving a few inches of room to prevent a messy boil over. Turn your burner to high.
- Place your extract beer kit’s specialty grains into the grain steeping bag. Tie off the top with a knot. Use a thermometer to monitor the temperature closely. Once the water is 155 °F, steep the grains in the water for 20 minutes & closely maintain the temperature.
- Remove & discard the specialty grains – DO NOT squeeze the excess water from them, as this will release unwanted tannins. Then bring your wort (unfermented beer) to a boil. Once you see the first boiling bubble take your pot off the burner.
- Stir in your malt extract into the pot, stirring slowly and making sure nothing sticks to the pot or clumps up. Once dissolved, return the pot to the burner on medium-high heat.
- Monitor the brew kettle at all times, because boil overs may happen & are tough to clean up.
- Bring the wort up to a slow rolling boil. Once achieved, add your “Bittering” hop addition and start a 60 minute timer. Depending on the beer style, your kit will include a unique combination of hop additions. Add any “Flavoring” hops with 15 minutes left in the boil. Add any “Aroma” hops with 2 minutes left in the boil.
- After the 60 minute boil, shut off your stove and take the pot off the burner. You’ll need to create an ice bath in your sink with a few pounds of ice and cool water. Place your brew pot – with the lid on to prevent contamination – in this ice bath to chill the wort down to 75 °F. Yeast shouldn’t be added to hot wort, or else they can be stressed or scalded.
- While your wort is chilling, you can sanitize your fermenting equipment. Anything that will come in contact with your beer should be sanitized – the fermenter, rubber stopper, funnel & transfer tubing. Thoroughly sanitize equipment for 60 seconds in your sanitizer mixture and let dry on fresh paper towels.
- Using a thermometer, verify that the wort in your ice bath is 75°F or below. Using a funnel, transfer your chilled wort into your fermenter. Try to leave any thick sludge behind in the pot. If any sediment is transferred, this is okay. It’ll settle at the bottom of your fermenter eventually. You can use a strainer at this step.
- If you notice that you have less than a gallon of wort, you should add water to reach the 1 gallon fill line. Then, add your yeast to the now-filled fermenter. You’ll need to aerate the wort to give yeast an oxygen-rich environment. You can do so by placing the stopper in the fermenter, closing the hole with your clean thumb, and shaking vigorously for a full minute. Once aerated, install the blow-off tubing – one end in the stopper and one end in a cup of water. This allows CO2 to escape, while keeping oxygen out. Once fermentation begins, oxygen is no longer helpful and can actually oxidize your beer.
-
-
FERMENTATION (~2 weeks)
-
-
-
- Your fermenter should be stored in a cool (60 – 75°F), dry place in your home. Keep away from windows or cold surfaces (like a basement floor). Cold temperatures can delay & slow down fermentation.
- Fermentation should begin within roughly 48 hours, though depending on the temperature and other factors, it can take up to 72 hours for the yeast to take off. You’ll see bubbles of CO2 and foam begin to form along the surface of the wort. In a few days, once fermentation has calmed down, you can replace the blow-off tube with an airlock. Be sure to fill with water to the “fill line.”
- Expect to see a lot of initial fermentation activity in the first few days after adding the yeast. This will eventually slow down dramatically for the remainder of the 2 week fermentation, but know that the yeast is still hard at work. Some beers may require a longer fermentation, so be sure to follow the instructions included in your extract beer kit.
-
-
BOTTLING DAY (~45 min, 2 weeks)
-
-
-
- Rinse bottles with warm water to remove any sediment (from recycled bottles) or dust from storage.
- Sanitize the bottles, racking cane & cane tip, transfer tubing and tubing clamp by soaking all components for 60 seconds. Let dry on fresh paper towels.
- When bottling a 1 gallon batch of beer you’ll need a large pot (larger than a gallon). Add 1.5 cups of water & exactly 2 Tablespoons of white table sugar to this pot and heat on medium-high, stirring to completely dissolve the sugar. Boil for 5 minutes then cover to let cool completely. This is called “priming sugar” and it is the fuel that will carbonate your beer in bottles.
- Once the pot and priming sugar are completely cool, it is time to siphon your beer from the fermenter into the pot to combine. This transfer ensures that the sugar properly mixes with your beer for consistent carbonation. The siphon technique is used to avoid splashing or disturbing your beer – remember that introducing oxygen or bubbles is unwanted at this stage.
- To start the siphon you’ll need a bowl of clean water. Dunk the transfer tubing, with the clamp attached to one end & left open, into the bowl to completely fill it with water. Close the clamp and attach the other end to the racking cane. This is your siphon starter.
-
-