
29 Jan Top Hard Apple Cider Kit for new cider makers
If you’ve ever wanted to make you own hard cider at home, the best way to get started is with a Hard Cider Brew Kit. An affordable, all-in-one kit includes the essentials: reusable equipment, professional ingredients and user friendly instructions for a stress free introduction to cider making. Instead of sourcing multiple components from different websites, opt for a Hard Apple Cider Kit that includes everything you need in one box. Approachable enough for first time cider makers and perfect for gifting, Craft a Brew’s hard apple cider kit is one of the most affordable on the market without sacrificing quality or delicious taste.
-
- One of the most affordable kits on the market – $45.00
- High quality ingredients
- Industry-standard equipment that can be used to ferment beer, wine and other beverages
- Makes not just one, but three 1 gallon batches (unlike most other kits)
- User friendly instructions with recipe variations & flavor ideas
- Compact equipment works well in any sized home or kitchen
- Great price point for gifting
- Naturally gluten-free
A gallon of dry, sparkling cider – about ten bottles – is ready to drink in just 20 days (~45 minutes of active hands on time) and 4 basic steps. Cider finishes at a just-right ABV of between 4.5 – 6% and is naturally gluten free!

Let’s review what goes into a batch of apple cider, what comes in our Hard Apple Cider Kit and how to make it yourself!
HARD APPLE CIDER KIT INGREDIENTS
JUICE:
The base of hard apple cider is natural apple juice – the main source of fermentable sugar. You’ll choose your own juice to use with our hard cider kit – source from the store or even a local orchard! If you’d like to make a more traditional cloudy hard cider, opt for unfiltered apple cider or even a fall spiced apple cider. If you prefer a cleaner tasting, clearer hard apple cider, opt for regular apple juice.
For a 1 gallon batch of hard cider you’ll need 1 gallon of juice. You must use juice that is without preservatives and is 100% natural. Preservatives, like Potassium Sorbate or Sodium Benzoate will prevent fermentation from happening by killing the yeast. Ascorbic Acid is okay, though.
YEAST:
Yeast is a living organism that is technically a fungus. It grows and multiplies by consuming the natural sugar in apple juice and converting that sugar into alcohol during fermentation. Yeast will also help carbonate your hard cider in bottles by releasing CO2.
Hard cider can ferment using a variety of yeast strains, including beer yeast, champagne yeast and more. Every Craft a Brew hard apple cider kit includes 3 packets (for 3 separate batches) of a popular English ale yeast strain that is commonly used in cider-making. It’s a perfect strain because of its quick fermentation time and the enhanced clarity it provides.
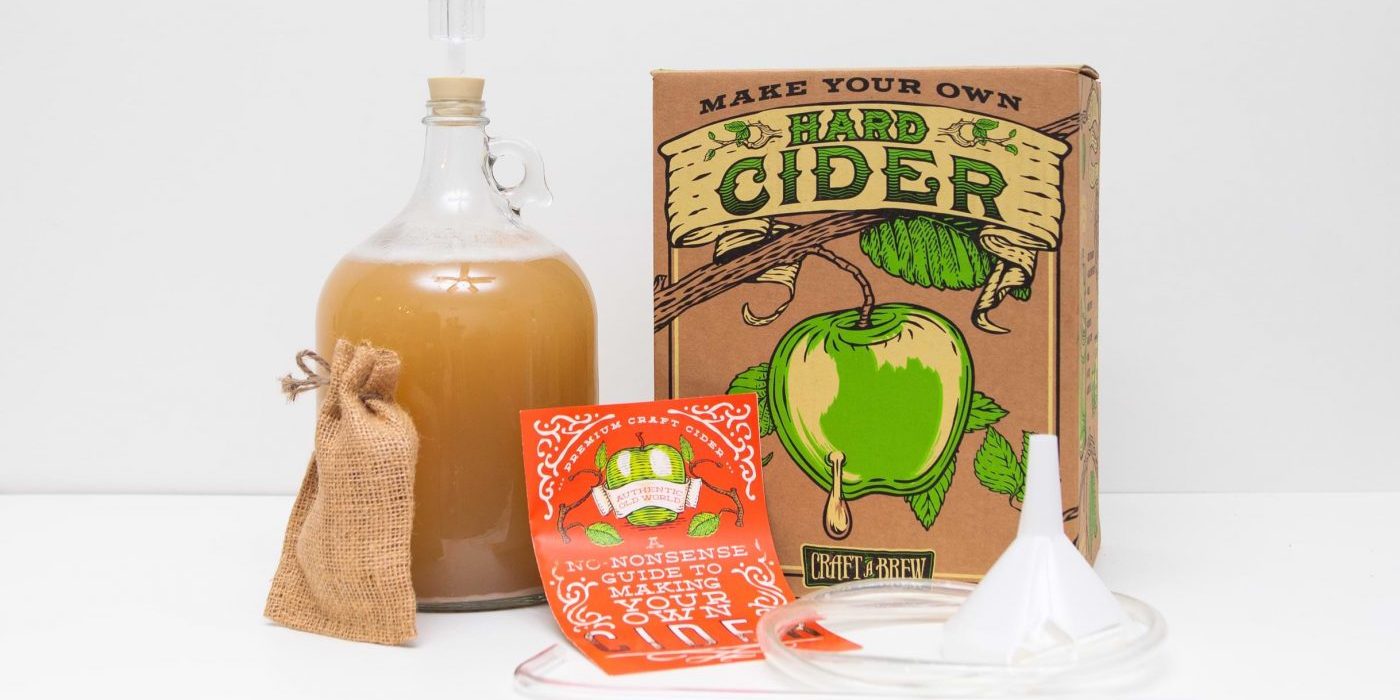
HARD APPLE CIDER KIT EQUIPMENT
The process of making hard cider at home involves just a few standard tools. You certainly don’t need a sophisticated set up to start – you just need a few basics to get up and running. Our Hard Apple Cider Kit comes with the essential equipment that lasts & can be used to ferment other beverages like beer or wine.
")
WHAT’S IN OUR KIT:
-
- 1 gallon glass carboy (fermenter)
- Funnel
- Racking Cane, Transfer Tubing & Tube Clamp
- Rubber Stopper & Airlock
- Guide to Making Hard Cider
- Rubber Stopper & Airlock
- Hard Cider Recipe Kit (ingredients to make three batches of cider):
- 3 packets of yeast
- 3 packets of sanitizer
")
ITEMS YOU WILL NEED TO SOURCE:
-
- 1 gallon of apple juice or cider base
- Bottles & caps
BOTTLING YOUR HARD CIDER:
Bottling is an important step in the cider-making process – it’s how your sparkling cider will become carbonated! When it comes to bottling your cider you’ve got options:
-
- The simplest type of bottles to use are swing-top bottles – the same ones that Grolsch beer is bottled in. You can buy two 6 packs, enjoy the beer and use the empties! These bottles don’t require bottle caps or a capper tool, making them a streamlined option.
-
- You can also use one of our bottling kits. You can choose our Deluxe Bottling Kit to bottle your hard cider. This includes ten 12oz light-proof bottles, a capper tool and 30+ bottle caps. You can also choose our Clear Bottling Kit, which includes eight 16oz clear bottles and reusable twist off caps. These clear bottles would need to be stored out of sunlight to prevent light strike (aka: skunked cider).
-
- Alternatively, you can save your empties as you drink beer or hard cider at home. Pry-off beer bottles are reusable and compatible with our Capping Kit. This includes a capper tool and 24+ bottle caps.
HOW TO USE OUR HARD
APPLE CIDER KIT
At its most basic level, hard cider is fermented apple juice. Because the ingredients are so simple, the process is also simple and speedy – ready to drink in just 20 days!
FERMENTATION (Day 1 – 10):
This is the basic process for making hard apple cider. If you’d like to see some variations or flavoring ideas, proceed to our Variations & Flavor Ideas section for ideas. You’ll need to plan your variations BEFORE you start the fermentation process.
The Craft a Brew Hard Apple Cider Kit comes with enough sanitizer to clean your equipment and enough yeast to ferment THREE separate batches. Be sure to only use one packet of each per batch. Don’t be afraid to try new things with each batch, whether you use a different juice base, fruit or fall spices.
Step 1: Sanitize your equipment
Proper sanitation is regarded as the most important step in making hard cider at home. Yeast is the only organism you want touching your cider. Any other bacteria will compete with the yeast for the fermentable sugars and will multiply quickly, making the cider sour and undrinkable. Be sure that everything that touches your cider is properly sanitized with the included sanitizer packet.
To sanitize your equipment for fermentation you will use only half of a packet of sanitizer – save the remaining half for bottling day. Mix half the packet of powdered sanitizer with about a gallon of water in a pitcher or bucket. Sanitize your fermenting equipment – carboy, rubber stopper, airlock & funnel – by soaking the components for 60 seconds each in the mix before placing on fresh paper towels to drip dry. This oxygen-based sanitizer doesn’t require you to rinse off the sanitizer. Instead, you can allow all components to drip dry on paper towels. They don’t need to be completely dry before proceeding.
Step 2: Add apple juice & yeast to your fermenter
After you sanitize your equipment you’ll add one gallon of apple juice directly to the carboy with the included funnel. Use clean scissors to open one packet of included yeast and add contents directly to the jug.
Step 3: Aerate
Now you’ll need to make sure the yeast has an oxygen rich environment in order to multiply and ferment – so you’ll need to aerate the juice. Take your sanitized rubber stopper and plug the top of your full carboy. Take a clean thumb and place it over the hole in the rubber stopper. Shake the carboy vigorously for more than a minute. NOTE: oxygen is essential at the very beginning of fermentation, which is why you must aerate the juice. But once the yeast gets to work, oxygen is the enemy. You should NOT disturb your carboy, swirl or agitate it until bottling day to prevent oxidation.
Step 4: Ferment
Take your sanitized airlock and remove the cap. Fill the reservoir with water until you reach the “fill line” as marked. Place the cap back on the airlock and insert into the rubber stopper. The airlock does not need to poke all the way through the hole to make an airtight seal. Now, place the rubber stopper into the carboy.
Choose a location in your house that where you can maintain a stable fermentation temperature – between 60 – 75 *F – for the next 10 days. The carboy should be out of direct sunlight as well. Keep in mind that a garage’s temperature may fluctuate too much and a basement may get too cold. Your cider will stay in one while it ferments for 10 days. As fermentation continues, yeast will fall out of suspension and accumulate in a layer at the bottom of the carboy.
Throughout these 10 days you will notice that fermentation activity might take a few days to really take off. You might also find that fermentation activity trails off. This is normal! You just want to make sure you see some sort of activity & bubbling in the airlock – this is a sign that the yeast is consuming sugars and releasing CO2.
BOTTLING & CARBONATION (DAY 11 – 20):
Once your airlock has stopped bubbling fermentation is complete! Note that your cider may still be bubbling and fermenting on or after day 10. Be sure to wait until fermentation is finished before bottling. Cider will need to be bottled and aged for 10 days in order to carbonate. Bottling day takes about 30-45 minutes and is a lot easier with an extra set of hands – so you may want to recruit a buddy to help on bottling day!
Step 5: Sanitize bottling equipment
Rinse your bottles and caps with warm water to wash away any dust or sediment inside, especially if you’re reusing old beer bottles. Sanitize the bottles, caps, racking cane + tip, transfer tubing + clamp and a mixing spoon using the remaining half of your sanitizer packet. Once again, you’ll mix the powdered sanitizer with 1 gallon of warm water and allow the equipment to soak in the solution for 60 seconds each. This oxygen-based sanitizer does not require you to rinse the sanitizer off. Instead, you can allow all components to drip dry on paper towels. Bottles don’t need to be completely dry before filling.
Step 6: Prepare a priming sugar solution
Now you’ll prepare your priming sugar. This sugar water mixture provides the remaining yeast in your cider the necessary fuel to create CO2 in bottles. In a large pot (larger than a gallon) add 1 ½ cups of water and exactly 2 Tbsp of white table sugar. Heat on medium high and stir in the sugar until it completely dissolves. Boil for 5 minutes, then remove from the burner. Let cool with a lid on.
Step 7: Combine cider and priming sugar solution
Once the pot and sugar water are completely cool you will siphon the cider from your carboy into the pot of priming sugar. This siphon technique is used so as not to disturb or oxidize the cider. A siphon is also used to most efficiently separate the cider from the sediment layer that develops at the bottom of the carboy.

Place the clamp on your transfer tubing so that you are able to stop and start the flow. You should be able to clamp it shut with your thumb and release it with your other hand. Go ahead and practice clamping & unclamping.
Fill a bowl with fresh, clean water and submerge your tubing to fill it completely with water – keep the clamp open. Close the clamp and attach the non-clamped end to the top of the racking cane – this will be your siphon starter.
Siphoning is made easier when the carboy is stacked high (on a counter or table top) and the pot is either in your sink, on a chair or on the ground. This way gravity gives you an assist.
Insert the racking cane, with the tip on the end, into the carboy. Make sure the tip is far enough away from any sediment so it doesn’t suck it up. Hold the clamped end of the tubing over the sink or a cup/bowl to catch the water in the tube. Unclamp to let this water escape. Clamp as soon as cider starts to freely flow out from the tubing.
Let the siphon transfer all the cider from your carboy into the pot of priming sugar. Mix gently with a spoon to disperse the sugar evenly.
Step 8: Fill bottles & let carbonate
Repeat the siphon process again – filling the tube with water to start a flow – in order to transfer cider from the pot into bottles. Fill each bottle slightly above the base of the neck and cap. Leaving too much headspace will make the carbonation process take longer.
Store your capped bottles at room temperature (not in the fridge) and out of sunlight for 10 days. After 10 days, place one bottle in the fridge to chill. Pop it open to assess the carbonation level. If it’s fizzy enough for you, refrigerate the rest of the batch to lock in the carbonation. If it’s still too flat, let the bottles age at room temperature for 3-5 more days before testing another bottle.
HARD APPLE CIDER KIT VARIATIONS & FLAVOR IDEAS
Yeast and apple juice create a pretty delicious beverage, but this simple base leaves plenty of room for personalization and experimentation. If you want to get creative with your hard cider flavor combos keep these 3 tips in mind:
-
-
-
Add your favorite fruit. In order to ferment with fruit you’ll need to make a thin puree that evenly distributes the flavor. Add your desired fruit (peach, berries, pear, etc.) to a blender and incorporate some water if necessary. Strain the mixture through a cheesecloth or mesh strainer. Boil the strained fruit for 5 minutes (to sanitize) and let cool before adding directly to the carboy and then add yeast.
-
Use spices for effortless added flavor. Try adding cinnamon sticks (we suggest 2 per gallon), whole cloves, star anise, cardamom pods, etc. directly to the fermenter after 2 days of fermentation.
-
Incorporate other juices with your apple juice base. You will need to use at least 50% apple juice, though. Many fruit juices can work well as a 50/50 or 75/25 blend – think cranberry or cherry. We advise against using lemon juice or other citrus juices. They’re quite acidic and have low sugar content, making fermentation pretty difficult.
-
-
Let’s Recap!
-
- Our Hard Apple Cider Kit includes just about everything you need to get started: reusable equipment, instructions & ingredients to make three separate batches!
-
- You’ll need to source 1 gallon of your favorite apple juice or apple cider base. Make sure it is natural and without preservatives.
-
- You’ll also need to source bottles for your hard cider. Each gallon makes ~ten 12oz bottles. You can start with our Deluxe Bottling Kit, our Clear Bottling Kit, you can source swing-top bottles or you can save your empty pry-off beer bottles and use our Capping Kit.
-
- You can customize your flavors with each batch by adding spices, adding fruit or splitting your apple juice base in half with another fruit juice.
-
- If you run out of yeast you can always restock with a Hard Cider Recipe Kit, which includes 3 more sets of yeast & sanitizer to clean your equipment and ferment another gallon.