
26 Oct Top 15 Kombucha Brewing Kit Questions, Answered
Your first batch of homebrewed Kombucha can be a little intimidating, but using a Kombucha brewing kit at home is super simple and super rewarding! Not to mention it’s a huge money saver. After your first batch of Kombucha, your bottles will work out to about $1 each – compare that to the $4-6 bottle from the supermarket.
If you’re new to brewing Kombucha, check out our post Kombucha Making Kit – How To Make It At Home for the step-by-step how to!
We’re answering the 15 most frequently asked questions from new Kombucha brewers about our Kombucha brewing kit. Everything you ever wanted to know about Kombucha brewing, but were too afraid to ask.
No matter where you are on your homebrewing journey, we have a beer making kit that’s right for you. We’ll walk you through our variety of beer making kits and how to choose the best home beer brewing kit to jumpstart your new hobby, including our:
1. What’s the deal with the sugar?

Kombucha is a fermented beverage. Fermentation is a process in which yeast & bacteria convert sugars into acids & alcohol. While our Kombucha brewing kit does include a cup of sugar, keep in mind that this sugar is for fermentation & carbonation and NOT for you.
If you have concerns about sugar content in your finished Kombucha, there are a few ways to reduce the sugar. Sugar is converted into acids throughout fermentation – so the longer you let your Kombucha ferment the more sugar will be fermented out. We recommend tasting your Kombucha after 7 days of fermentation. If it’s too sweet for your taste, continue fermenting. You can taste daily until it’s tart enough or fermented enough for your taste. Kombucha will be sweeter when there is still some residual sugar and will get more tart, tangy & vinegar-y as fermentation continues to convert the sugars.
If you are concerned about added sugar, you can also opt to NOT add any fruit, juice or flavors to bottles. The “second fermentation” Kombucha undergoes in bottles uses natural sugar from fruit to help carbonate your booch. Again, much of this sugar is converted into CO2 by yeast, but there will be more sugar present when adding fruit to the bottles.
TIP: to add sweetness without adding too much sugar try a few drops of fresh kiwi juice in each bottle. This will add sweetness and help with carbonation. You can also add hops (like in beer) to your bottles. This process of “Dry Hopping” actually extracts floral, fruity flavor from hops rather than the bitterness you may be familiar with in hoppy beers and IPAs.
2. Is Kombucha going to get me drunk?
Store bought kombucha and homebrewed kombucha do contain trace amounts of alcohol – a natural byproduct of fermentation. Though the alcohol by volume (ABV) will be less than 0.5% – comparable to non-alcoholic beer. Some super markets MIGHT still ID you if you’re buying kombucha.
During Kombucha fermentation, the yeast & bacteria in the SCOBY (Symbiotic Culture of Bacteria & Yeast) work together to “self-limit” the alcohol. Yeast convert sugars into ethanol and the bacteria converts this ethanol into acids.
So yes, there is technically alcohol in your homebrewed Kombucha, but no it will not get you buzzed.
3. How can I tell whether my Kombucha is fermenting?

When making your first batch of booch with a Kombucha brewing kit, you may not know what to look for or how to tell whether it is fermenting properly. There are a few quick ways to confirm that your Kombucha is fermenting:
-
- The tea in your jar will slowly get cloudier and lighter in color.
- The Kombucha will get progressively less sweet. It will begin to smell & taste more tart, tangy or vinegar-y after ~5+ days.
-
- The SCOBY will get thicker, whiter, more opaque or a brand new culture will begin to grow at the surface. A new baby SCOBY may be forming along the surface.
Don’t worry if you don’t notice all of these changes immediately or at the same time. Every fermentation will vary. If you don’t notice any of these signs fermentation may be progressing slowly or may be stunted due to cold temperatures.
Kombucha needs relatively warm temperatures for successful fermentation – between 70 – 85*F. If you can’t achieve this naturally at home you can try a few things:
-
- Move your Kombucha to the warmest room in your house.
- Wrap a towel or t-shirt around your jar to insulate.
- Use a heat wrap for the most consistent fermentation temperature control.

A heat wrap is a great accessory when using a Kombucha brewing kit for the first time, especially in chilly months. Our Kombucha heat wrap has low, medium or high heat settings and an adhesive thermometer to keep fermentation temperatures stable.
Using a heat wrap helps combat winter weather, but also helps prevent mold growth, helps balance the yeast to bacteria ratio and helps you brew consistent Kombucha every time.
4. What do I do with my SCOBY between batches?
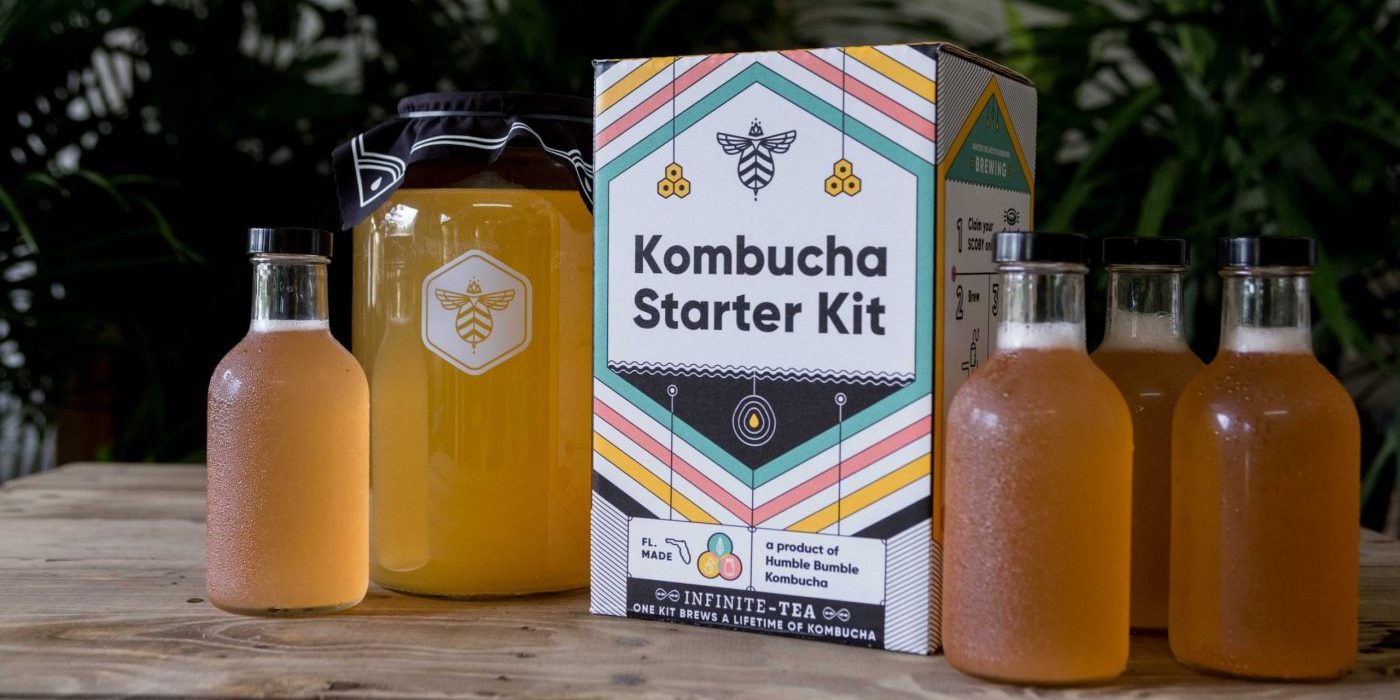
Our Kombucha brewing kit comes with a SCOBY to get you started. A SCOBY is essentially reusable for infinite-TEA (see what we did there?) After fermentation you’ll need to remove your SCOBY from the jar and reserve 1 – 2 cups of fermented Kombucha along with it. This is your “starter tea” for your next batch! Set these aside in a glass bowl while you bottle your Kombucha.
Once your Kombucha is bottled you’ll return the SCOBY & starter tea to the jar and cover with cloth and a rubber band. This is called a SCOBY Motel – seriously! Your SCOBY can be stored this way, at room temperature, for up to 4 weeks before you’ll need to either 1) brew a new batch of Kombucha or 2) “feed” the SCOBY with some more sweetened tea. Dissolve ⅓ cup sugar into 1 cup of hot black tea. Let cool before adding to your SCOBY Motel.
5. How do I start my next batch?
")
Everything else in our kit is reusable, including the SCOBY! After your first batch is complete, all you need is more tea & sugar to start another! You’ll need 1 cup of sugar and 6 tsp (or 6 bags) of black tea. This can be sourced at the supermarket OR you can purchase a tea & sugar refill HERE.
Don’t forget to save 1 – 2 cups of your fermented Kombucha before bottling each batch – this liquid plus your SCOBY help jumpstart fermentation.
6. Can I use other kinds of tea?
Generally, black tea is the best tea to use for Kombucha fermentation. It’s caffeinated and contains nutrients for healthy fermentation. You can also use a combination of black and green tea if you’d like, though using black tea is recommended for the first few batches with your new SCOBY to build a strong foundation.
You should not use herbal teas (like peppermint or chamomile tea), as they’re not caffeinated and don’t actually contain TEA (Camellia sinensis), which is crucial for the fermentation process. Herbs in herbal tea can also add unwanted oils that interfere with the SCOBY.
You should not use scented, spiced or flavored teas (like Earl Grey, Masala chai, etc.) as these flavors can negatively impact the SCOBY. Flavors should only be added to bottles and never come in contact with the SCOBY.
7. What do I do if I need to take a break from brewing?
If you’re not ready to make a full batch of booch or need to take an extended break from your Kombucha brewing kit, you will still need to “feed” your SCOBY every 4 weeks to provide it with sugar and keep it hydrated. You can do this with 1 cup of hot black tea (use loose leaf or bagged tea) and ⅓ cup of sugar dissolved in it. Let this cool to room temperature before adding to your SCOBY Motel.
8. My SCOBY looks weird – is it mold?
Chances are…NO. People often mistake normal SCOBY growth for mold. Mold growth is quite rare, but it can happen. If you’re ever in doubt DO NOT TOSS your SCOBY and DO NOT DUMP your batch. Email us at support@craftabrew.com for a second opinion.
SCOBYs vary drastically in appearance. Each one is unique and will have its own size, shape, texture, color, opacity, thickness, etc. They can be lumpy, bubbly, dark, light, thin, thick or stringy.
Most people assume they are seeing mold in their Kombucha when a new SCOBY is forming along the surface. This can often look like a film is developing, which can appear patchy or “fuzzy” – but this is just a new culture! You may also see dark spots or stringy bits on or underneath your SCOBY, which are often just concentrations of yeast OR air bubbles.
If mold did develop on your SCOBY, it is likely caused by:
-
- fermenting at too cold a temperature. This is the most common cause, as Kombucha needs warm temperatures to fend off mold. Be sure to ferment within the temperature range recommended in our instructions (70 – 85*F). If the ambient temperature in your house dips below 70*F for an extended amount of time, your Kombucha will be more prone to mold. Try wrapping your jar in a towel or store in the warmest room in your house. A heating pad is also an option for consistent temperature control.
-
- storing the SCOBY in the fridge before brewing.
-
- not allowing the tea/sugar to cool completely before introducing the SCOBY. Scalding the culture before fermentation will leave it weaker and more prone to mold.
-
- airborne molds in your house near the fermenting jar. Be sure to ferment away from house plants, produce, waste bins or compost bins to prevent cross contamination.
-
- using fruit or other flavors during fermentation. Do not introduce any fruit, herbs, spices or flavors to the SCOBY – they can expose the SCOBY to foreign bacteria or yeast from fruit skins.
Here are several examples of perfectly normal, healthy SCOBYs. You’ll notice no 2 SCOBYs look the same:


9. My SCOBY sank – is it dead?
NO! There is a general misconception that a sunken SCOBY means that it’s dead. This is NOT true. The position of your SCOBY in the fermenting jar does NOT matter. Your SCOBY may sink, float or hang out somewhere in the middle.
If your SCOBY does sink or change position, this is just a reaction to a change in temperature. If the temperature in your home dips a few degrees the SCOBY may sink, but it is NOT DEAD. Be sure the ferment within the recommended temperature range of 70 – 85 *F to keep your SCOBY happy and healthy.
SCOBYS don’t necessarily “die.” Unless you see mold growth OR the SCOBY becomes dehydrated & shriveled due to low liquid levels, your culture is just fine. If ever in doubt, email us at support@craftabrew.com for a second opinion before dumping your batch.
10. I have too many SCOBYs now, what do I do with them?
You’ll notice a new SCOBY growing each time you ferment a batch of booch – so you’ll eventually have a collection of several cultures! For each fermentation we recommend using 1 – 3 cultures. Using too many SCOBYs can throw off the tea to SCOBY ratio & can ferment your kombucha too quickly, making it more tart more quickly. If you find yourself with excess SCOBYs we have a few tips:
-
- Add a second fermenting jar to your set up! If you have multiple SCOBYs, you can divide them between two jars for side by side fermentation! Twice the Kombucha in the same amount of time!
- If you don’t have room for that much Kombucha in your fridge, use a second glass jar as a SCOBY Motel to house your extra cultures and some reserved fermented Kombucha. This keeps the unused SCOBYs hydrated while not in use.
- Give one to a friend!
- Compost or toss the oldest or bottom-most SCOBY(s) or layers.
11. How do I know when my Kombucha is ready to bottle?

When determining whether your booch is ready to bottle, your tastebuds are the best tool. Your Kombucha needs to ferment for 7 – 14 days. On day 7, taste your Kombucha with a clean spoon. It’ll likely be pretty sweet at this point, especially if you’re fermenting your very first batch. Continue fermenting & tasting your Kombucha daily until the taste is to your liking. The longer you ferment, the more tart & vinegar-y the flavor will become.
You can also use pH testing strips to track your Kombucha’s progress. These are NOT required, but measuring pH with test strips can help you better understand fermentation. While a pH reading doesn’t tell you when your Kombucha is “done,” it does tell you how acidic it is. Acidity does help your Kombucha & SCOBY stay safe from mold.
We recommend using pH testing strips as you taste your fermenting Kombucha. Keep notes of the pH reading and the flavor descriptors. Is it too sweet for you? Make note of the pH. Is it too vinegar-y? Make note of the pH. Once you determine the pH that coincides with the perfect flavor, you can brew more consistent Kombucha every time! The “ideal” pH range for Kombucha is between 2.5 – 3.5, but your tastebuds will steer you in the right direction.
12. Can I use mason jars to bottle & carbonate my Kombucha?
")
We do NOT recommend using mason jars to bottle and carbonate your Kombucha. They don’t produce consistent, fizzy carbonation because they don’t provide an airtight seal. Additionally, we advise against any contact with metal, which is what mason jar lids are made of.
For the most consistent carbonation, we recommend using our Kombucha Bottling Kit, which includes eight 16oz glass bottles and airtight twist off caps. Swing top (flip top) bottles are also a great option!
13. Do I have to bottle my Kombucha?
The short answer is yes. You should definitely bottle your Kombucha in order to lock in the flavor and to achieve the perfect fizz. Kombucha will only develop trace amounts of bubbles during fermentation, so it will be nearly flat if you don’t bottle carbonate.
Kombucha will also continue to ferment and get more tart and sour if left in its jar. If you don’t bottle your booch and leave it in the jar, you’ll end up with Kombucha vinegar.
14. My Kombucha isn’t super carbonated – what should I do?
If you prefer your Kombucha really fizzy, we have a few tips for nailing the carbonation each time:
-
- Wait a little longer. If Kombucha isn’t as fizzy as you’d like, give the bottles more time to carbonate at room temp. The yeast most likely just needs more time to eat all those sugars and create carbonation.
-
- Use fruit. The carbonation process will be much quicker and much stronger if you provide more “fuel” in the form of fruit. Whole, juiced, pureed, chopped, fresh or frozen will work!
CHECK OUT OUR POST ON FLAVORING AND BOTTLING TIPS HERE
-
- Mind the headspace. More headspace = more time to carbonate. Leaving too much headspace in each bottle will extend the carbonation timeline. You need to leave some headspace, but make sure the bottles are filled to the base of the neck of each bottle for best results.
-
- Mind the temperature. Kombucha will not carbonate in the fridge or at cold temperatures – this will stunt the yeast and prevent any carbonation activity. If you open a bottle that’s been in the fridge & find that it lacks carbonation – just take the rest of the batch out, let warm to room temperature and let stand for a few days before testing or burping a bottle. The yeast will become active again and resume the carbonation process!
15. How long is my Kombucha safe in the fridge?
Homebrewed Kombucha is best enjoyed within 6 – 8 months for the best flavors. Kombucha should be stored in the fridge once it is carbonated to your liking to keep it fresh and to prevent over carbonation.
Still hungry for more knowledge? Have questions about our Kombucha brewing kit that weren’t covered here? Shoot us an email at support@craftabrew.com and we’ll be happy to help!